Why a Running Toilet Is a Bigger Problem Than It Sounds
That faint hissing or trickling sound from the bathroom isn't just annoying - it's expensive. A toilet that runs continuously can waste a significant volume of water every single day, and because the leak is often invisible (water going directly from the tank into the bowl), many households don't notice until the water bill arrives.
Unlike a dripping faucet you can see and hear clearly, a running toilet can be subtle. The fill valve may cycle on briefly every few minutes, or the tank may drain so slowly that the sound blends into background noise. Either way, the water waste adds up fast. For context, the average US household uses around 80-100 gallons of water per person per day - a single leaking toilet can rival or exceed that on its own.
If you're trying to reduce water costs at home, fixing a running toilet is one of the highest-return repairs you can make. For more perspective on how household inefficiencies quietly drain budgets, see our article on reducing water waste around the home.
The Three Most Common Culprits Inside Your Tank
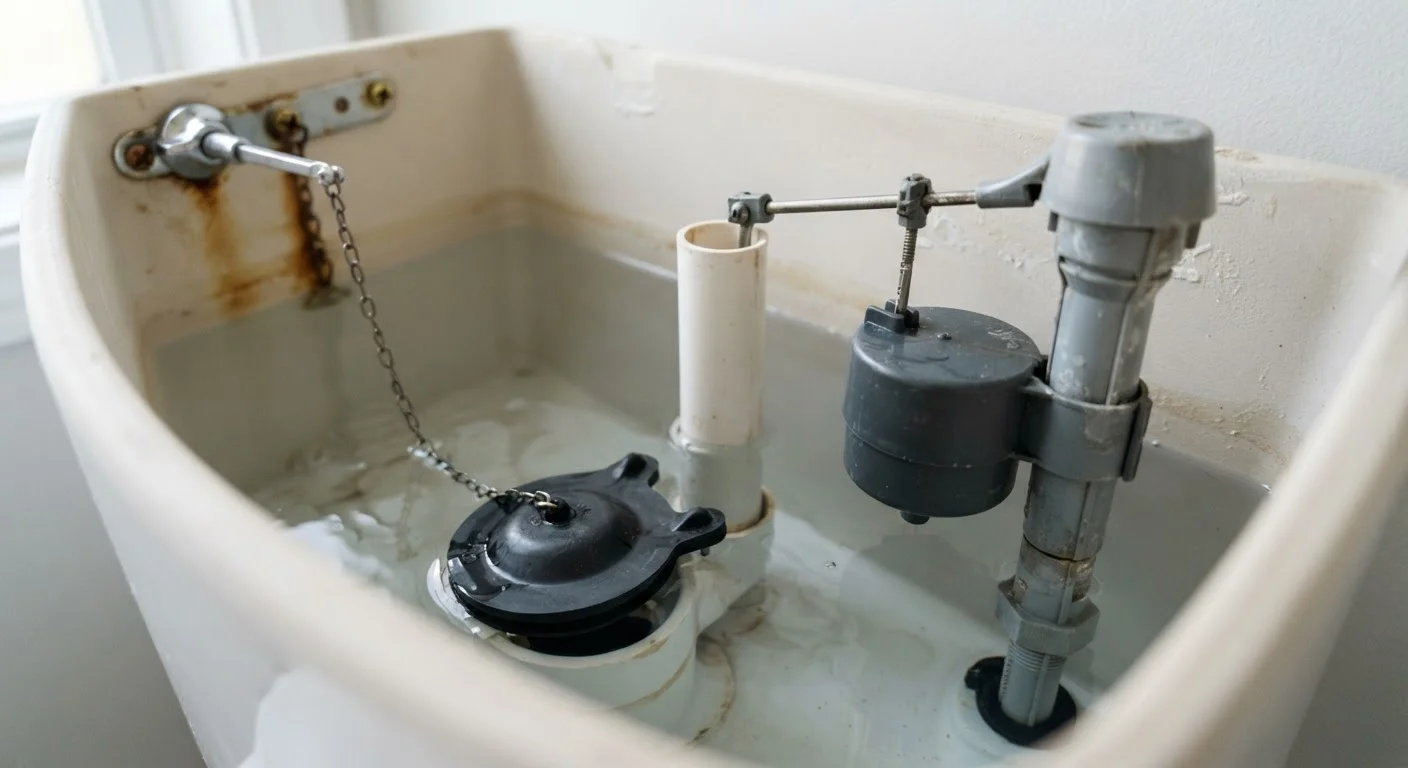
Lift the lid off your toilet tank and you'll find three main components that control water flow. When any one of them fails, the result is a toilet that won't stop running.
1. The Flapper
The flapper is a rubber seal at the bottom of the tank that covers the flush valve opening. Every time you flush, it lifts to release water into the bowl, then drops back down to seal the tank so it can refill. Over time, the rubber warps, hardens, or accumulates mineral buildup - and it no longer seals completely. Water slowly seeps past it into the bowl, and the fill valve never gets the signal to stop.
This is by far the most common cause of a running toilet, and also the cheapest fix. Replacement flappers are inexpensive and available at any hardware store. You don't need any tools - just turn off the water supply valve behind the toilet, flush to drain the tank, unhook the old flapper from the overflow tube ears, and snap the new one in place.
2. The Float and Fill Valve
The float (either a ball float on an arm, or a cup float on a newer fill valve) monitors the water level in the tank. When water rises to the correct level, the float shuts off the fill valve. If the float sits too low, the valve keeps running trying to reach a level it never achieves. If the float is set too high, water overflows into the overflow tube and drains continuously into the bowl.
Adjusting a float arm is usually as simple as bending it slightly downward (on older ball-float designs) or turning an adjustment screw (on modern cup floats). The water level should sit about one inch below the top of the overflow tube.
3. The Fill Valve Itself
If the flapper is fine and the float is properly adjusted but the toilet still runs, the fill valve may be worn out. These valves have internal seals that degrade over years of use. Replacing a fill valve is a slightly more involved task - you'll need to shut off and disconnect the water supply, drain the tank, and swap in a new valve - but it's still a DIY-manageable job for most people and the parts are affordable.
Turn Off the Water Before You Start
Before touching anything inside the tank, locate the shutoff valve on the wall behind the toilet and turn it clockwise until it stops. Then flush once to drain the tank. This prevents accidental flooding and gives you a dry workspace. If the shutoff valve is stiff or won't close fully, stop and call a plumber rather than proceeding.
How to Confirm the Problem Before You Start
Before buying parts, spend two minutes confirming which component is actually failing. The dye test is the standard first step: add a few drops of food coloring to the tank (not the bowl) and wait 10-15 minutes without flushing. If color appears in the bowl, your flapper isn't sealing.
Next, listen and watch. If you hear the fill valve running even when the bowl isn't discolored from the dye test, check whether water is trickling into the overflow tube - this points to a float issue. If the valve cycles on every few minutes for no apparent reason, that's the classic sign of a slow flapper leak (sometimes called a phantom flush).
Taking a few minutes to diagnose correctly saves you from replacing the wrong part. Many unnecessary repair calls happen because homeowners skip this step. For a broader look at common DIY missteps, our piece on home repair myths is worth reading before you reach for your tools.
When to Stop and Call a Plumber
Most running toilet repairs are genuinely DIY-friendly - no soldering, no permits, no specialty skills required. But there are situations where calling a licensed plumber is the right call:
- Cracks in the tank or bowl: No flapper or valve swap will fix a structural crack. This typically requires full replacement.
- Problems with the main supply line or shutoff valve: If the shutoff valve behind the toilet won't close fully, you may not be able to safely drain the tank for repairs without shutting off water to a larger part of the home.
- Renters: Always check your lease before attempting plumbing repairs. Many leases require tenant-reported repairs to go through the landlord or a designated professional. Unauthorized repairs - even successful ones - can create liability issues.
When in doubt, getting a professional assessment is a reasonable choice. A plumber can often diagnose and fix a standard running toilet in under an hour, and you'll know the repair is code-compliant.
Taking care of small plumbing issues promptly is similar in spirit to staying on top of other household inefficiencies. Just as a slow drain left ignored can become a bigger problem, a running toilet that's deferred tends to cost more - both in water waste and eventual repair complexity.
This article provides general home maintenance information for educational purposes. Always verify local plumbing codes and permit requirements with your municipality before undertaking repairs, and consult a licensed plumber for any work that falls outside basic component replacement.